Is your furnace clicking on, burning for a few seconds, and then cutting out? It’s a frustrating cycle when you’re just trying to keep your home warm.
According to Natural Resources Canada, space heating accounts for a remarkable 63.6% of the energy used in the average Canadian home.
This means that the scary repair you’re facing might actually be a simple, DIY-friendly maintenance task.
In this guide, we’ll show you exactly what does a bad flame sensor look like with clear visual cues, explain why they fail, and walk you through the simple fixes that can save you a pricey HVAC service call.
We’re here to help you get your home back to that cozy temperature you deserve, without the unnecessary headache. So, let’s get into the topic now with all the basics you need to know.
What Is a Furnace Flame Sensor?
Before identifying what does a bad flame sensor look like, let’s first learn what a healthy one does.
The flame sensor is a small metal rod, typically two to four inches long, mounted inside the burner assembly directly in the path of the flame. It connects to the furnace control board via a single insulated wire and is secured with one hex-head mounting screw.
Its job is deceptively simple but technically precise.
When the burner ignites, the flame passes over the sensor rod and ionizes the gas particles surrounding it. Those ionized particles conduct a tiny amount of direct current electricity, typically between two and ten microamps, back to the control board.
The control board reads that signal as confirmation that a flame is present and keeps the gas valve open. If the signal disappears or drops below approximately 1.5 microamps, the board immediately shuts the gas valve as a safety precaution.
This process is known as flame rectification, and it is the fundamental electrical principle that makes the entire ignition safety circuit work.
The flame itself acts as a diode, converting the alternating current signal sent from the control board into a rectified direct current signal that the board can verify. It happens in real time, every second the furnace is running.
However, this whole thing about a bad flame sensor is much more difficult to understand for a newbie. That’s why we have a guide on furnace flame sensor problems, which you should read before moving forward.
What Does a Healthy Flame Sensor Look Like Before It Goes Bad?
If you do not know what a healthy sensor looks like, you cannot confidently identify a bad one.
Most often, people expect a broken part to look burnt, melted, or totally snapped in half. Probably, you are looking at your sensor right now and thinking it looks okay because it isn’t black or broken.
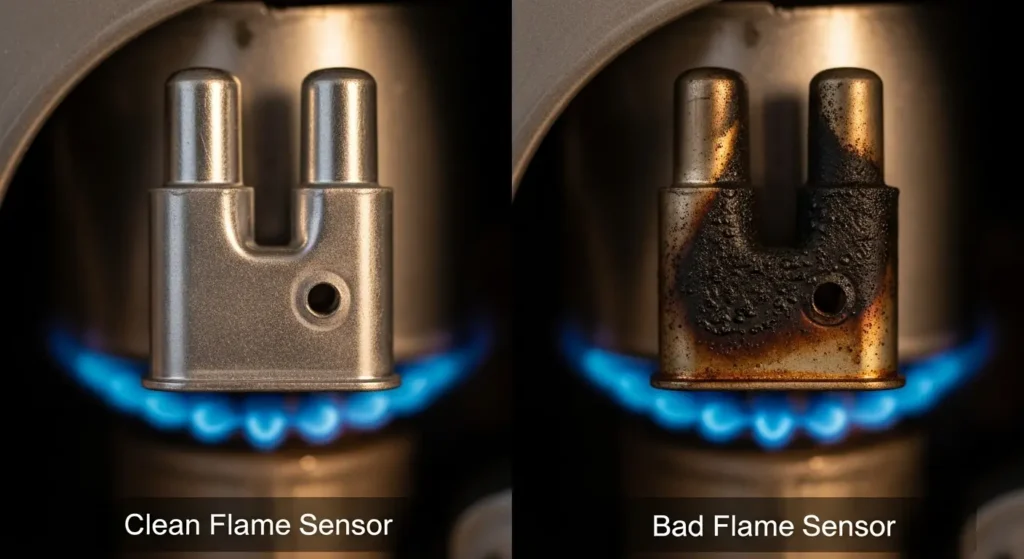
In fact, even a tiny bit of dust you can barely see is enough to stop your heat from working. A healthy sensor can be identified by a smooth, shiny metal rod and a clean, white ceramic base without any cracks.
However, let’s now identify first what those good signs are, so you can spot the small changes that cause big problems.
1. The Surface of the Metal Rod
As we talked before, a healthy sensor rod should look like polished stainless steel.
The Finish: It should be smooth and slightly reflective, similar to a clean kitchen fork.
The Color: Look for a consistent silver or light grey. There should be no velvety black soot, white chalky buildup, or rainbow-colored heat tinting.
The Texture: Run your fingernail (carefully) along the rod. It should be perfectly smooth. If it feels like fine sandpaper or has pitting (tiny holes), the metal is beginning to degrade.
2. The Condition of the Porcelain Insulator
The metal rod is held in place by a white ceramic (porcelain) block. This is a critical electrical barrier.
Structural Integrity: In a healthy sensor, this porcelain is bright white and completely solid.
The Hairline Check: Look for tiny, spider-web cracks. A healthy sensor has zero fractures. Even a microscopic crack can allow electricity to leak to the furnace frame instead of traveling back to the control board. This can actually lead to an immediate system shutdown.
3. Alignment and Positioning
Even a clean sensor can fail if it isn’t positioned correctly.
The Angle: The rod should be straight and firm. If it’s wobbling in its housing or leaning to one side, it may have been bumped or damaged by extreme heat.
The Flame Path: When the furnace kicks on, the rod should be positioned so that the flame fully engulfs the top half of the metal.
4. The Wiring Terminal
Check where the wire plugs into the base of the sensor.
Connection: The metal tab should be bright and free of rust or green corrosion.
Insulation: The wire itself should be flexible, not brittle or charred. If the plastic coating on the wire is melted, it’s a sign that the sensor, or the entire burner area, is getting too hot.
Well, it is pretty easy to identify a good sensor once you know what to look for. Your furnace itself tells a story through the way it behaves, usually giving you plenty of warning before it quits on you entirely.
You just have to be more observant of those small changes in the metal and the ceramic base. If you aren’t paying attention, a tiny bit of carbon can turn into a total system lockout on the coldest night of the year.
If not caught early, you’ll find yourself shivering while waiting for an emergency repair technician.
Now, as you look for the specific answer to what does a bad flame sensor look like, let’s dive into the clear warning signs.
What Does a Bad Flame Sensor Look Like? A Complete Visual Breakdown
So what does a bad flame sensor look like, exactly? The honest answer is that it depends entirely on how it has failed. There are five distinct visual failure modes, and each one tells a different diagnostic story.
Some are fixable with nothing more than a piece of emery cloth and fifteen minutes of your time. Others demand immediate replacement.
When you understand these signs, you stop guessing. You can walk right up to your furnace, check the sensor, and know exactly how to fix it. This keeps you in control and helps you avoid wasting money on a repair you don’t need.
Let’s look at the signs, which are also the most common reasons furnaces stop working in the winter.
1. Black Soot and Carbon Buildup
The most common issue is a thin layer of black or dark grey soot covering the metal rod. Every time your furnace runs, tiny particles from the fire stick to the sensor.
Over time, this soot creates a blanket that hides the flame from the sensor.
Even if the fire is burning hot, the sensor can’t detect it through the carbon layer. The furnace then assumes there is no fire and shuts down the gas for safety. This is usually fixable with a simple, gentle cleaning.
2. White Oxidation or Chalky Metal
If your sensor isn’t black but looks dull and white, you are looking at oxidation. This is very common in humid areas or damp Canadian basements.
This white, chalky film acts as an electrical wall. It prevents the tiny signal the furnace needs from traveling through the rod.
While you can often scrub this off, check the metal underneath. If you see tiny holes or pitting in the steel, the metal is degrading, and the sensor should be replaced soon.
3. Cracked Porcelain Insulators
The white ceramic base that holds the metal rod is just as important as the rod itself. If you see any cracks, chips, or spider-web lines in that porcelain, the sensor is officially dead.
The porcelain acts as an insulator to keep electricity flowing in the right direction. When it cracks, the electrical signal leaks out and hits the metal frame of the furnace instead of the control board. You cannot glue or repair a cracked sensor. This is a non-negotiable sign that you need a brand-new part.
4. A Bent or Warped Rod
A flame sensor must be positioned perfectly to do its job. The rod should be straight and sit directly in the path of the burner flame.
If the rod looks twisted, warped, or is leaning away from the fire, it won’t work.
If the flame doesn’t wash over at least an inch of the metal, the sensor won’t generate enough power to keep the gas valve open. You can try to bend it back, but be careful. Heat makes these rods brittle, and they can snap with very little pressure.
5. Corroded or Melted Wiring
Sometimes the rod looks perfect, but the problem is at the connection point. Look at the single wire plugged into the base.
Check for green rust on the metal clip or melted plastic on the wire itself. If the connection is loose or corroded, the message from the sensor can’t reach the furnace brain.
If you see melted insulation, it is a warning sign that your burners might be producing too much heat, which is a safety issue that a professional should check.
So, we now know the answer to what does a bad flame sensor look like, and it was likely much simpler than you expected.
We are still only halfway through the diagnostic process. While the look of the sensor tells you the why, the way your furnace behaves tells you the when.
Now, it is time to look at the specific warning cycles and patterns your furnace uses to signal that it’s time for a fix.
What Does a Furnace Do When the Flame Sensor Is Failing? Behavioral Symptoms to Watch For
These behavioral symptoms often surface in your daily experience with the furnace before you ever open the access panel and visually confirm what does a bad flame sensor look like.
Recognizing them early can prevent a complete system lockout on the coldest night of the year.
Below are the most common symptoms you should watch for to catch a problem before it turns into a total system failure.
The 3-10 Second Shut-Off (Short Cycling): This is the most classic sign. You’ll hear the burner ignite and see the flames catch, but everything simply dies a few seconds later.
Because the sensor can’t maintain a steady electrical signal, the control board cuts the gas for safety. If you notice your furnace keeps turning on and off, this short cycling is almost always the culprit.
System Lockout: After three failed tries to stay lit, most modern furnaces will just give up. This is called a soft lockout. The furnace stops trying to light the burners to prevent gas buildup. You’ll usually see a flashing LED error code on the control board, and the system won’t try again until a timer runs out or you manually reset the power.
Blowing Cold Air: If your blower fan is running but you aren’t feeling any heat, your sensor might be failing. The fan stays on to clear out the system, but since the burners can’t stay lit long enough to warm the air, you end up with cold air circulating through your home.
This is a common reason why a furnace blows cold air during a Canadian winter.
Yellow or Flickering Flames: A healthy burner should produce a steady blue flame. If you see yellow or flickering fire, it means you have dirty combustion. This creates unburned carbon that coats your sensor in soot very quickly.
More importantly, yellow flames can be a safety risk, so it’s a good idea to include a professional furnace maintenance check to ensure your home is safe from carbon monoxide.
Rising Energy Bills: Every time your furnace tries to light and fails, it wastes gas and electricity without actually heating your home. If your bill is higher than usual but your house feels colder, your furnace is likely working twice as hard because the failing sensor is cutting the heating cycles short.
Recognizing these behavioral patterns is the best way to get ahead of a total breakdown. Your furnace is designed to protect itself, and these short cycles or lockouts are its way of sounding the alarm before a small issue becomes a dangerous one.
By paying attention to how your unit cycles, you can save yourself from the frustration of a cold home and an expensive emergency call. Now that you know the symptoms, the next step is to practically confirm.
How Do You Test a Flame Sensor With a Multimeter to Confirm Failure?
It is good to know what a bad flame sensor looks like, but sometimes your eyes can play tricks on you. A sensor might look perfectly clean to the naked eye while its internal electrical connection has actually failed.
Can you imagine how much time and money you could waste replacing parts that are still perfectly fine?
That means you need a more scientific way to prove the part is dead before you go out and buy a new one.
Knowing exactly when it’s time for furnace repair often comes down to having the right data in front of you. Testing the sensor yourself gives you the peace of mind that you’re fixing the actual root cause of the problem.
For this reason, we will now go through a professional multimeter test to confirm if your sensor is truly sending the right signal to your furnace.
1. The Resistance Test (Power Off)
This test checks if the metal rod is broken on the inside. You do this with the furnace completely powered off.
How to do it: Set your multimeter to the Ohms (Ω) setting. Touch one probe to the sensor terminal and the other to the metal frame of the furnace.
The Reading: A good sensor usually reads between 300 and 1,000 ohms. If your meter shows “OL” (Open Loop), it means the electrical path is snapped. No amount of cleaning will fix an internally broken sensor. You must replace it.
2. The Live Microamp Test (Furnace Running)
This is the gold standard test used by pros to see how the sensor performs while the fire is actually burning.
How to do it: Set your meter to DC microamps (µA). You need to connect the meter in series, which means the electrical signal must pass through your meter on its way from the sensor to the control board.
The Reading: Once the burners light, look for a reading between 2 and 6 microamps.
3 to 5 µA: Perfect health.
Below 1.5 µA: This is the danger zone. Most furnaces will snap the gas valve shut if the signal stays this low.
0 µA: The sensor or the wiring has completely failed.
You might not believe it, but a tiny metal rod about the size of a paperclip is often the only thing standing between you and a freezing house. There are thousands of homeowners who spend hundreds of dollars on emergency service calls every winter for a part that takes less than ten minutes to check.
Still, most people wait until the heat goes out completely before they ever think about the condition of their sensor.
After all, your comfort and safety shouldn’t be left to guesswork when you now have the tools to diagnose the problem yourself.
Final Thoughts
You now have everything you need to answer the question of what does a bad flame sensor look like from every angle.
The clean versus replace decision ultimately comes down to what the sensor looks like combined with what the multimeter confirms. Neither test alone gives you the full picture. Together, they give you a complete and confident diagnosis.
Remember that the flame sensor is not a comfort component. It is a safety device that prevents unburned gas from accumulating in your combustion chamber.
Ignoring the warning signs is never worth the risk. If your furnace continues short-cycling after you have addressed the sensor, or if you are ever uncertain about gas-related components, a certified HVAC technician can run a full system diagnostic and rule out anything more serious underneath.